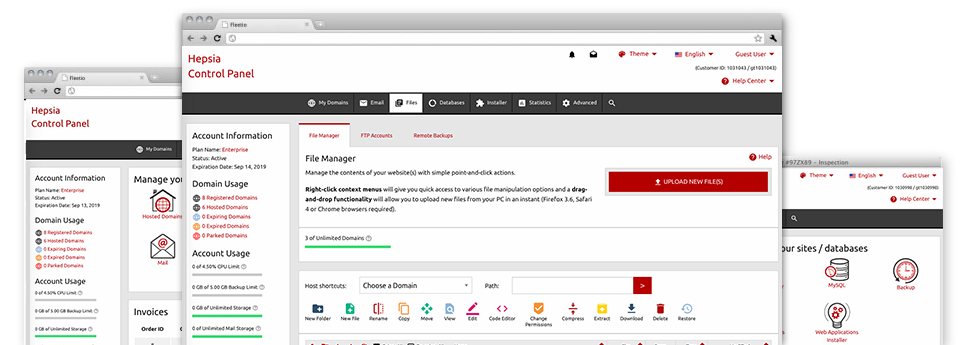
Applied as FTP client alternatives, web file management tools have always been slow and poorly featured. Yet, with the File Manager included in the Bean Counter Site Control Panel, you won’t just have a rapid, responsive and easy–to–work–with file administration software, but also a software tool that will make an external FTP software unnecessary. Have a look at some of the options that we have built–into our File Manager.
Drag ’n’ drop file uploads
The most simple method to publish files
Importing files with an FTP tool is an obsolete and really insecure way of moving data files from your notebook or computer to a web server. Because of this, we have integrated drag’n’drop file upload support in the File Manager. Just drag the data files that you want to add from your desktop into your browser and they’ll begin to upload in your web hosting profile over a protected SSL connection.
You don’t need to deploy any additional software pack, web browser extensions or apps. The drag–and–drop function operates equally well on Windows, Mac or Linux.
Right–click context menus
Handle all files with only a click of the mouse
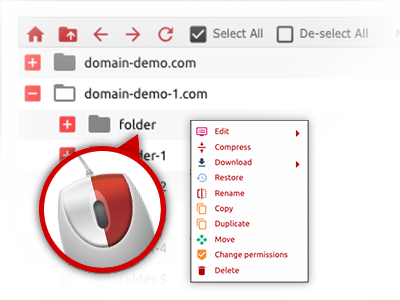
The vast majority of File Managers list all of the actions that one can conduct over a file or folder on the top of the webpage. We think the latter is just not user–friendly enough. Thanks to the File Manager, you can access all file managing choices any time you right–click a file or directory. This approach is likewise valid for a number of files/folders.
It’s possible to rename, copy, move, download, edit, preview, archive, unarchive and delete just about any file or folder you decide using a click of the mouse.
Archive/Unarchive files
Be in charge of archives with just a click
The File Manager comes with a built–in archive/unarchive solution that may help you add large archives and extract them inside your website hosting account within seconds. The moment compressing a file or folder, it will be easy to decide on the name for the archive which will be created along with its extension – .ZIP, .RAR or .TAR.GZ. Furthermore, it is possible to archive already present files or folders with a mouse–click.
The archive/unarchive option you can find at the File Manager allows you to use huge files straight from your Site Control Panel. No need to employ any third–party software like an FTP client as a way to upload a substantial file in your cloud hosting account or download any archive on your desktop.
Online file editors
Edit files directly from your Site Control Panel
From the File Manager you can manage your files directly on the net making use of many of the included software instruments. The text editor reveals the files with a plain text format, the code editor provides syntax highlighting for your .PHP or .JS files, and the WYSIWYG editor lets you to preview your changes as they show up live. Furthermore, all changes which you create and save will be displayed immediately on the world wide web, in order for you to examine them in your own browser and get back to generate more modifications, if you are not happy with the result.
There’s no need to download any files whatsoever, to change them through your PC and to re–upload them into your hosting account. Each of the editors are found through the buttons near the top of the file table or through the right–click context menus.
A logical folder structure
All your files arranged in a user–friendly manner
All of the files inside your website hosting account are sorted into folders. Each host does have its primary directory, which employs the file structure that you have defined. By doing this, it is easy to take care of all of your current hosts from a single location with no probability of becoming lost or puzzled.
By standard, you will notice each of the hosts conveniently listed in a table and when you click once on a given host, you will see the whole set of sub–folders and files associated with it. By clicking two times, you will go to a page that is devoted to that host only. An additional way to load the folder associated with a given host and also to work with it exclusively, is by using the drop–down menu near the top of the main File Manager file table.
A user–friendly interface
Be in charge of your data with merely a click of the mouse
The Bean Counter File Manager has been designed in such a manner to help you feel like handling the file explorer on your computer. It is provided with a possibility to drag your files and to drop them in a preferred location and indicates all of the available edit options on clicking the right mouse button. In addition, the tool comes with an integrated file preview option and other file editors making it possible for you to revise your files in real time from your Site Control Panel.
Also, we have listed a number of file management articles and how–to educational videos to guide you to rather quickly learn how to make use of the tool.
Work with multiple files
Change numerous files at the same time
Using the Bean Counter File Manager, you can pick out a wide range of files or directories like you do on your desktop computer or notebook. Simply hold down the Control (Command for Apple’s Mac OS) key and click on the wanted files/folders. In case you’d like, to pick lots of files/folders simultaneously, simply click one file/folder, press the Shift key and click on any file or folder.
After you have chosen the whole set of files that you need, you’ll be able to drag them into a pre–selected location, or use the right–click context menu to view a list of the accessible activities.
Quick & simple password protection options
The simplest way to guard your data
There is one standard path to protect a folder using a pass word – by making an .htaccess file. If, however, you’re not technically qualified enough, you’ll have difficulties carrying it out all by yourself. To help with making things easy for you, we have added a time and effort saving password protection interface to the File Manager accessible within the Site Control Panel.
To employ this option, just right–click on a directory and choose Password Protection. Then add the user name and the password that you want to employ and click on the button. That’s all. Now the chosen directory is going to be hidden from the public eye and will be available just to previously approved account holders.
